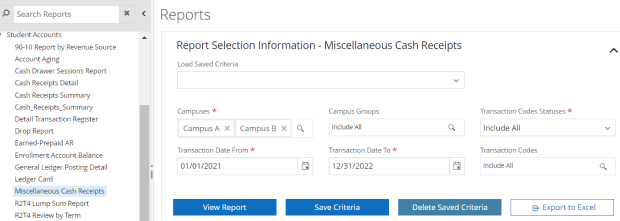
Miscellaneous Cash Receipt Report
You can use the Miscellaneous Cash Receipt report to list miscellaneous cash receipts from sources other than students, for example, bookstore or vending machine sales.
If you frequently generate reports with the same selection criteria, you can save the selection criteria under a name. This makes it easier to generate reports in the future with the same selection criteria.
Prerequisites
You must have:
-
Common - Reports - View authorization
-
Either Reports - Student Accounts - Miscellaneous Cash Receipts or Student Accounts - All Reports authorization (All Reports provides authorization to view all reports for Student Accounts.)
To configure the timeout duration for the Export to Excel button, your institution must have configured Export to Excel Timeout in Seconds![]() under Settings > System > General.
under Settings > System > General.
Access Method
Select the Reports tile > expand Student Accounts > select Miscellaneous Cash Receipts.
Procedure to Generate the Report
-
Specify the data selection criteria.
Transaction Date
 From To
-
Take the appropriate action.
Task Action to Take View the report 1. Select the View Report button. Anthology Student displays the generated report.
Export the report 1. Select the Export to Excel button. Anthology Student displays the Export Report Data dialog box.
2. Review, specify, or change the following value.
3. Select the Export button.
Anthology Student exports the generated report as a CSV file which may be viewed in Excel. In some cases, the exported file will contain additional data not displayed in the report on your screen.
Note: If you entered special characters like *, -, !, (, or ) in the report fields, Anthology Student automatically prepends an apostrophe to those field values upon export to Excel or CSV. The apostrophe is added to reduce vulnerability, as these characters are perceived by Excel as an actionable formula. Once the report is exported to Excel, Anthology suggests using find and replace on the characters only if necessary to restore original values.
Save the selection criteria 1. Select the Save Criteria button. Anthology Student displays the Save Criteria dialog box.
2. Specify the name to save the criteria.
3. Select the Save button. Anthology Student saves the selection criteria for the report.
Delete the selection criteria 1. Select the Delete Saved Criteria button. Anthology Student displays the Delete Criteria dialog box.
2. Select the Delete button. Anthology Student deletes the selected saved criteria for the report.
Details for the Report
In the report:
-
The totals are provided at the transaction code, campus, and report level
-
A cross-tabulated summary is displayed in the report footer. For each campus, there are amount-received totals for each date broken down by transaction code (type).
Example
The example shows the selection criteria for the Miscellaneous Cash Receipt report.
