Course Refund Policies
The U.S. Department of Education, your state's Department of Education, and your institution's administration may have different policies and procedures for refunding money to students when they leave school before completing their programs. The refund policy that is most advantageous to the student must be the one selected at the time the calculation is made. Refund calculations are triggered for a given student.
Course Refund policies are applied automatically when the Course status changes to Drop. If the billing method is configured as “Post Pending charges review”, the pending charges must be posted for the Course refunds to be posted on the ledger.
You can use the Course Refund Policies page to add, edit, delete, or deactivate the policies for course refunds that Anthology Student uses to calculate refunds. The refund calculations in Anthology Student support straight pro-rata refund policies. The calculations are based on the number of days or weeks completed by the student for the enrolled course. You can also configure several refund policies and select those for different circumstances.
Prerequisites
To view the page, you must have Student Accounts - Configuration - View authorization.
To edit the page, you must have Student Accounts – Configuration - Manage authorization.
To edit an item associated with more than one campus, you must have access to all the campuses. For example, if the item is configured to be available at three campuses and you only have access to two of the campuses, you can view, but cannot edit it. (When you add an item, you can only select campuses to which you have access.)
Access Method
Select the Configuration tile > expand Student Accounts > select Course Refund Policies.
Filters
By default, the grid displays all records for the campuses you are authorized to work with. You can use the drop-down at the top of the page to display only records for a specific campus.
Procedure to Add or Edit Items
-
If you want to:
-
Add a list item, select the New button on the toolbar
-
Add a list item by copying and modifying the item, select the required row, and select the Duplicate button on the toolbar
-
Edit a list item, select the item name in the list
-
-
Review, specify, or change the following values.
-
In Calculation Options, specify the following values.
Course Refund Policies are calculated based on the posted balance, not the pending balance. Course refund policies rely on Auto Correct Course Details
 being set to Yes. When "Auto Correct Course Details" is set to No, you are responsible for posting adjustments to avoid issues with later adjustments and re-bills in the term.
 -
In Refund Policy Associations, specify the following values.
-
Depending on your selection in the "Calculation Based On" field, take the appropriate action in the Calculation Based on Length grid or Calculation Based on Percentage grid.
Task Action to Take Add a refund record 1. Select the Add button. Anthology Student inserts an empty row in the Units column.
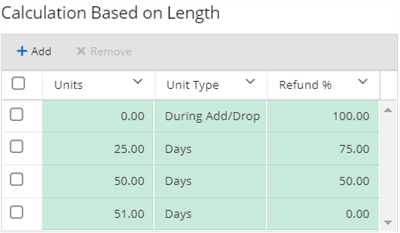
2. For Calculation Based on Length, specify the following values.
Example:
The Refund % could be configured to include the range of Units for different Unit Types:
1-25 Days = 75%
26-50 Days = 50%
51+ Days = 0%

3. For Calculation Based on Percentage, specify the following values.
4. Select the Save button. Anthology Student saves the record.
Remove a refund record 1. Select the record in the list.
2. Select the Remove button.
Anthology Student removes the selected record from the list.
-
In the Transaction Codes grid, review the values in the list.
You can select a value in the Action column to configure each code individually.
-
If you want to save and:
-
Continue making changes, select the Save button
-
Continue to add another item to the list, select the Save & New button
-
Close, select the Save & Close button
-
Procedure to Delete Items
-
Highlight the item in the list.
-
Select the Delete button on the toolbar.
The item is:
-
Removed from the list on the page and the list is redisplayed
-
No longer available to select on the forms that contain the list
Procedures for Deactivating Items
There is more than one method for deactivating an item.
| Method | Procedure to Follow | Result |
|---|---|---|
| Using a toolbar button |
1. Highlight one item in the list. 2. Select the Deactivate button on the toolbar. |
The item: • Remains displayed in the list with No in the Active column • Is also no longer available to select on the forms that contain the list |
| Editing the item |
1. Select the name of the item in the list. 2. In the Active drop-down, select No. 3. Select the Save and Close button. |
Because the item is not removed, you can also make it active again by selecting the Activate button.