Print and Work with Report Output
Once you have generated a report, you have options for working with the output in the report. For example, you can search, print, and export the report to different formats.
Options for Working with the Output on the Toolbar
All the reports have the same toolbar. The table shows the options when you use the Preview button.
| Action You Want to Take | Option to Use on the Report Toolbar |
|---|---|
|
Navigate the report |
|
|
Print the report |
|
|
Refresh the data in a report |
|
|
Return to the parent report (if the report has more than one level) |
|
|
Increase or decrease the size of the report (zoom in and out) |

|
|
Save the report to another format other than Microsoft® Excel |
|
|
Search the report |
|
Export Reports
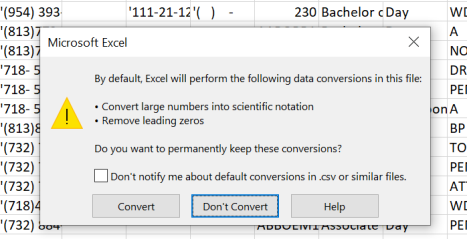
When exporting a report (any) to Excel, it is recommended to select the 'Don't Convert' option if the following Microsoft Excel pop-up appears. This will help the values in Excel to remain in the same format as seen in the application.

However, if you select the convert option, the system will:
-
Automatically remove leading zeros (0). If the exported file contains fields like Zip Code, Student Number, and so on, the leading number will be removed from these.
-
Convert the continuous letters and numbers into a date format
-
Convert large numbers into scientific notations
-
Convert the digits surrounding the letter "E" into scientific notations