Work with Batches
From the Processes tile, you can access features that process students or other items in batches. For example, if you click the Processes tile and select:
-
Document Assignments under Contact Manager, you can create a batch that assigns documents to multiple students
-
Approve Awards under Financial Aid, you can create a batch that approves multiple awards
- Assign Billable Services under Student Services, you can create a batch that assigns billable services to multiple students
-
 Review the training (Anthology Academy registration and login required):
 - Introduction to Batching (6 min.)
- Introduction to Batch Templates (9 min.)
- Template 1 Process Flow Example (13 min.)
- Template 2 Process Flow Example (11 min.)
- Template 1 Process Flow, Example 2 (12 min.)
- Template 1 Process Flow, Example 3 (9 min.)
- Cancel Batches (5 min.)
- Retry Deleted Batches (5 min.)
- Reminder: Batches Navigation (4 min.)
Overview of the Tabs for Batches
Features that process in batches:
-
Always have a History tab so that you can review information about the batch
-
In most cases, have a Process tab
There are some features that require more than one batch to accomplish your task and those features have 2 or more uniquely named tabs for each process. For example, you must import the National Do Not Call Registry and then use the imported information to update the Anthology Student database. In this case, you submit 2 batches in order (import and the update). The information for both batches is available on one History tab.
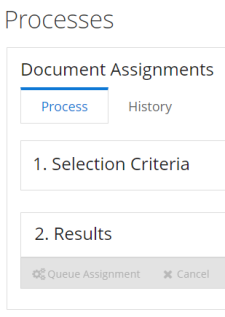
In most cases, you use the tabs from left to right. The following example shows the page for Document Assignments under Contact Manager.
The table provides an overview of the tabs.
| Tab | Overview | Example |
|---|---|---|
| Process or uniquely named tabs |
You specify the criteria that Anthology Student uses to create the list of students or items. For features that make changes during processing, you also specify the proposed changes. If the page has a Next button, it takes you to the next step. No action is taken until you click the Queue button and Anthology Student has processed the batch. For example, no data is gathered or changes are made. |
In most cases, you use the tabs from left to right. The following example shows the page for Document Assignments under Contact Manager.
|
| History |
Once processing is complete, you can: • Click the link in the message that Anthology Student displays below the command bar to display the results on the History tab • Select the History tab and then select the name of the batch in the list to display the results In cases where maintaining a history is not required, batches on the tab are only available to review for |
Common Actions Available for Batches
Most of the actions you can take for batches are the same. Once you are familiar with the actions for working with batches, you can take these actions for any batch.
If needed, you can cancel batches that are being processed from the History tab. For example, you can cancel a batch that has not started or a batch that has started, but is hung and is not completing.
Note: For batches that process items or students in records, review the records carefully before submitting the batch. When you cancel a batch during processing, the changes already made by the batch are not rolled back. For example, if there are 20 students or items in the batch and Anthology Student has processed 2 of them, the actions for the 2 students or items are not reversed.
-
In the list, highlight the record for the batch with the status of Processing in the Status column.
-
Click the Cancel button.
Anthology Student cancels processing for the batch.
You can use the History tab to retry batches that failed. When you retry a batch, Anthology Student follows the same process it did when you first queued the batch.
There is no limit on the number of times you can retry a batch.
-
In the list, highlight the record for the batch with the status Deleted in the Status column.
-
Click the Retry button.
Anthology Student tries to process any students or items in the batch that did not succeed the first time. It follows the same process that is used when you tried to queue and process the batch, including any validations.